Decision Tables
What's on this page?
- What is a decision table?
- Structure of a decision table
- Creating a decision table
- Accepted Data Types
- Working with inputs
- Working with outputs
- Modifying a decision table
- Saving changes
- Testing a decision table
What is a decision table?
A decision table resembles a spreadsheet and is used to specify the actions that are to be performed given certain conditions.
A decision table consists of input columns and output columns. Input columns (left side) define conditions, and output columns define actions (right side). Each row is a complete set of conditions and actions. When row inputs match, actions are produced for that row.
The same decision table can be used across as many flows as you wish.
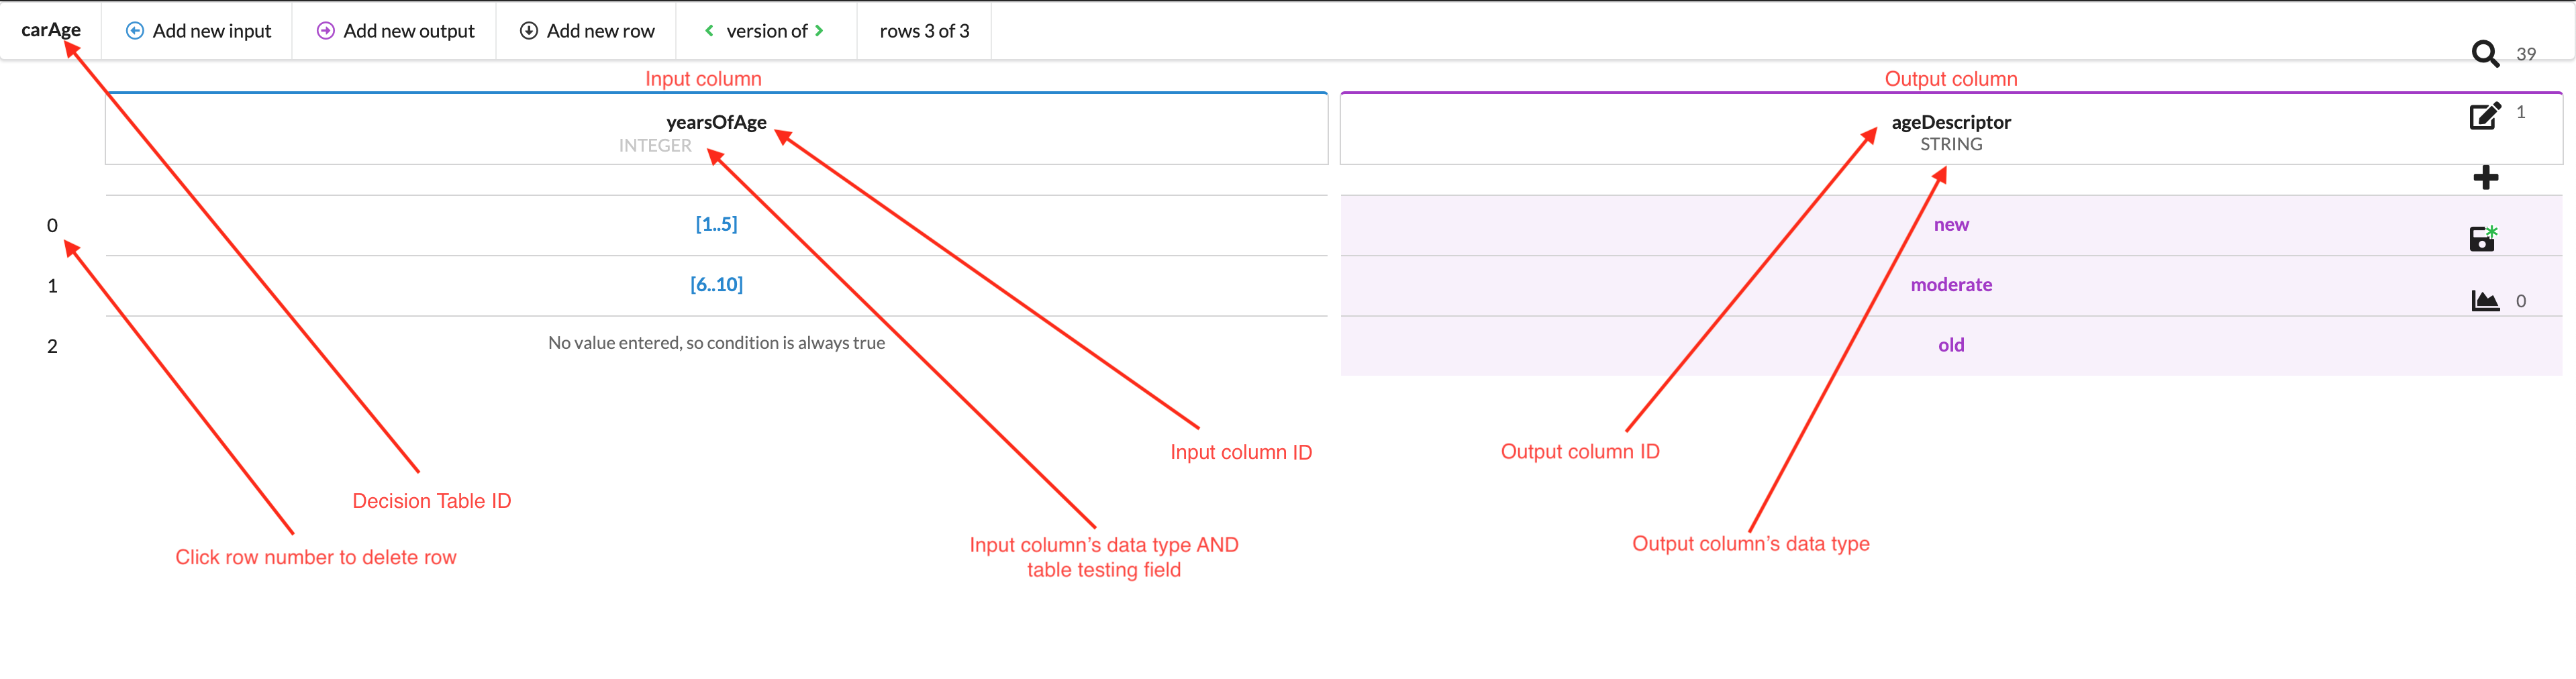
Structure of a decision table
The image below illustrates a decision table and its major elements.
Creating a new decision table
There are two ways to create a new decision table:
- By inserting it as a flow task (
CTRL + SPACEin the flow editor) - By creating a new asset either on the landing page or via the “add” icon on the right side menu.
Upon the creation of a new decision table, you will be presented with a table consisting of one input column and one output column.
From here, you will add your rows, edit your column IDs, and determine your data types.
Accepted data types
Decision tables accept the following:
- DATE: Numeric input following the pattern of dd.mm.yyyy
- DECIMAL: Follows Java specification for BigDecimal. See Java specification for BigDecimal
- STRING: Text, numbers, symbols
- DATE_TYPE: Numeric input following the pattern of dd.mm.yyyy, –:–
- BOOLEAN: True or false
- LONG: Follows Java specification for Long. See Java specification for Long
- INTEGER: Numeric value without decimal points
Working with inputs
The input column is always positioned on the left of the table. Input columns are indicated by the colour blue. Each input column handles only one input type.
Creating inputs
Upon clicking Add new input, a new input column will be created and its header must then be defined.
Upon clicking Add new row, a new row will appear and the input criteria can then be defined.

Modifying input column
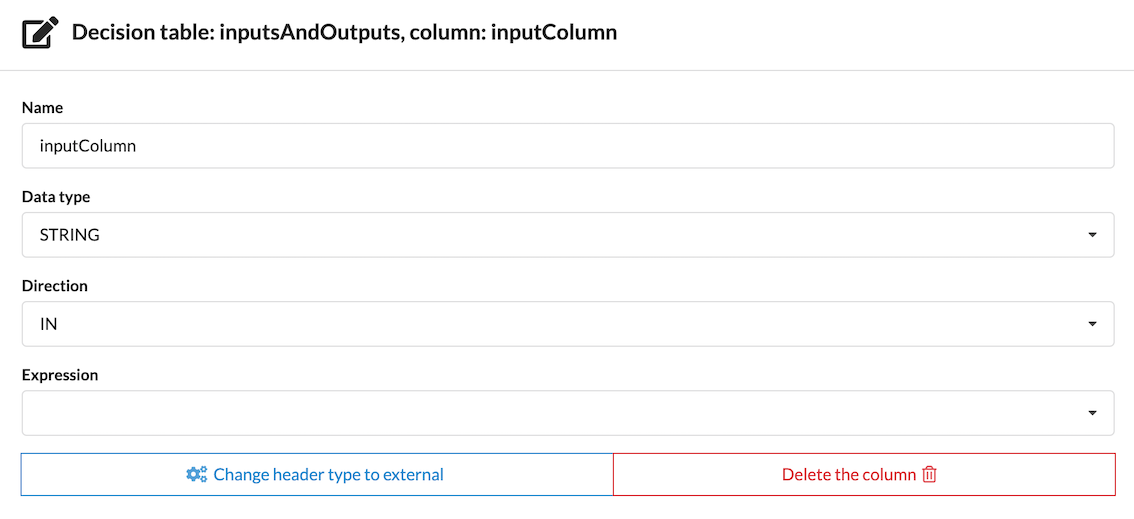
To modify the input column, click on its header to bring up the options modal window.
From here, you can change the input column's name, data type, and direction. If direction is changed to OUT, this column becomes and output column, moves to the right side of the table, and turns purple.
Expression can be used for a mass operation, especially in the context of comma separated value imports. For example, if you create a simple decision table via the Wrench's CSV import functionality, you will see something resembling the following:
Creating a table via Comma Separated Values:
You can also create a decision table by pasting CSV data.
The resulting decision table:
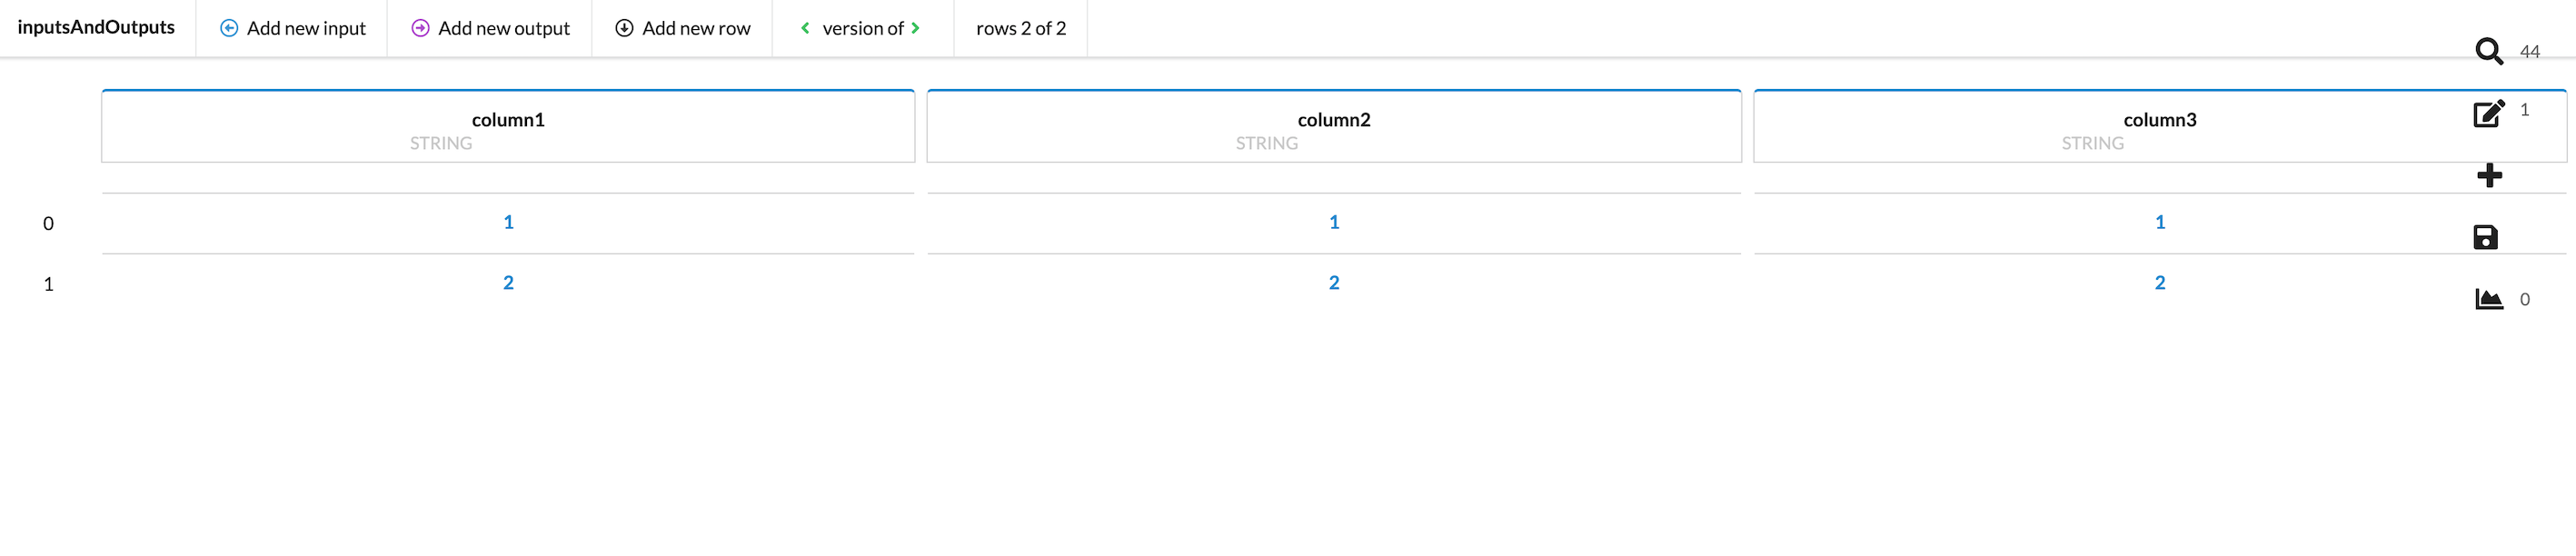
This decision table has no functionality associated with it; it is simply a collection of values with no calculations and no output. Adding functionality to each row could easily become time-consuming, and this is where the Expression field is useful.
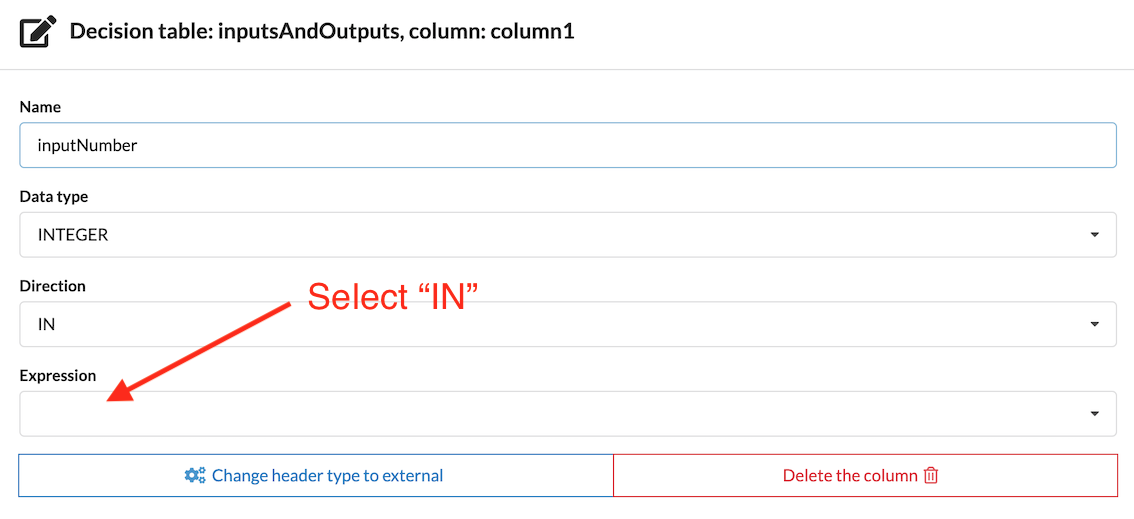
To give the column functionality and/or re-assign it as an output column, click its header. In the following example, we are modifying column1 by changing its ID, input type, adding an Expression, and setting that Expression to IN.
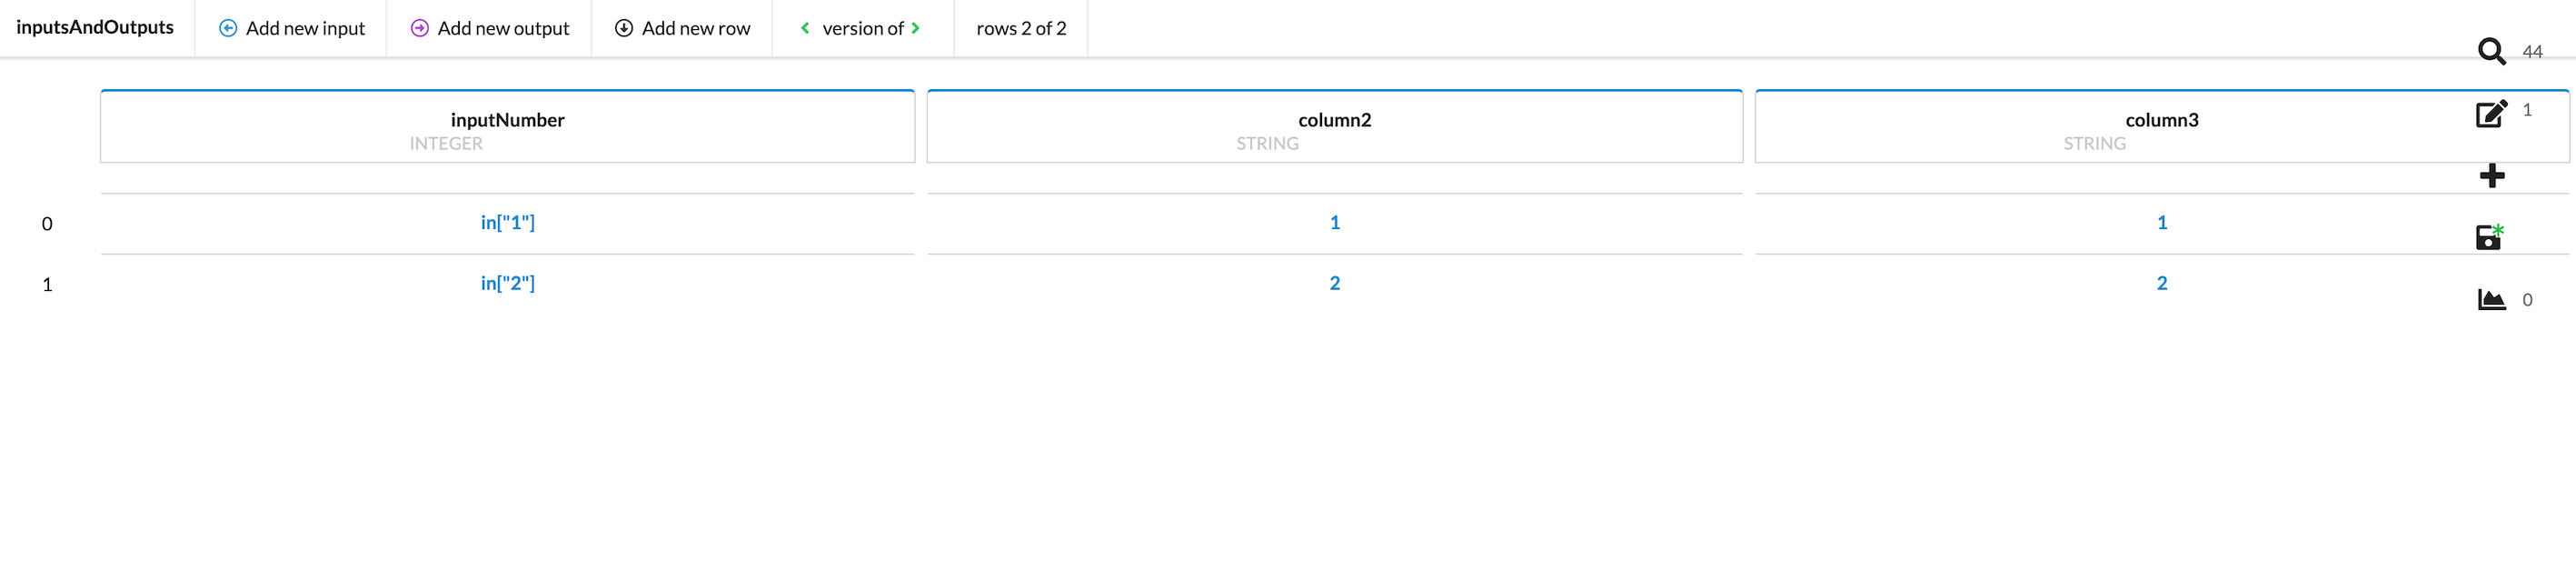
After this change, the table looks like this:
To modify the row to define how and against what they will be evaluated, click in the cell of the row you wish to modify to bring up the options modal window.
Values can be evaluated with comparison operators or as a range.
Evaluating with comparison operators
Evaluating single inputs
Single inputs can be evaluated against a single value using comparison operators.
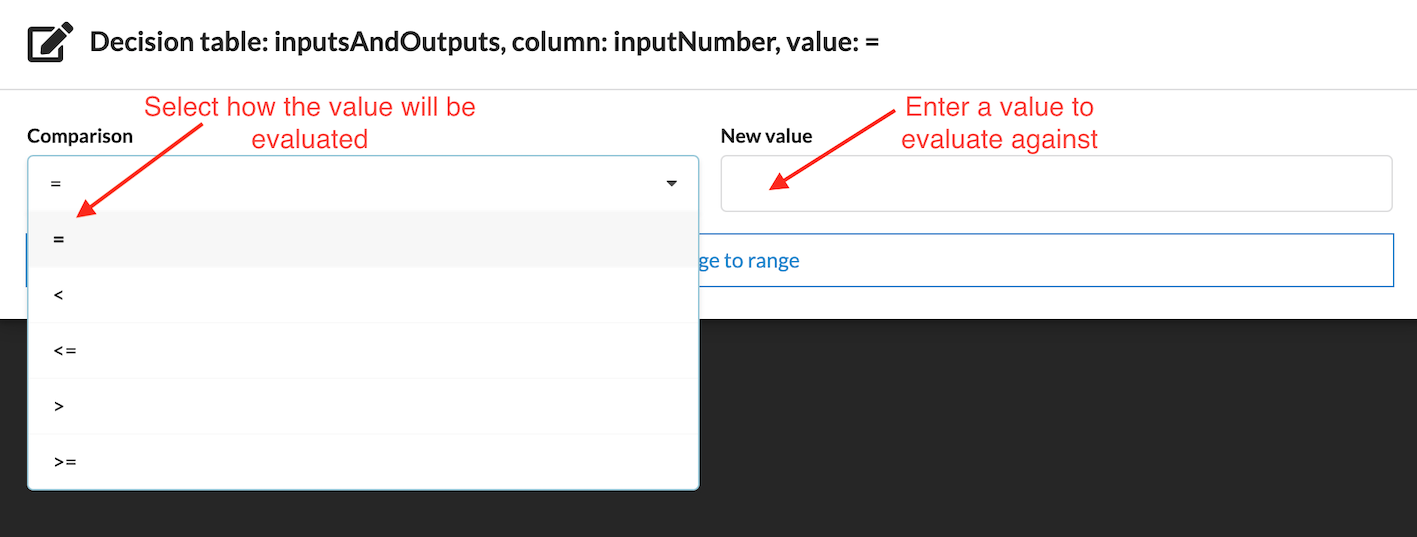
You may choose between the following comparison operators:
=: Equal to
<: Less than
<=: Less than or equal to
>: Greater than
>=: Greater than or equal to
The Wrench follows Java specifications for comparison operators. See Java specification for comparison operators
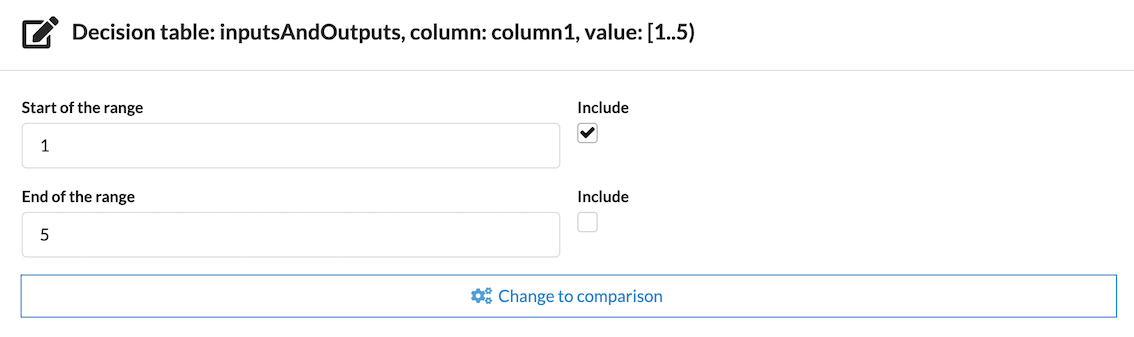
Evaluating with a range
Values can be evaluated according to whether they fall into a range.

Square brackets indicate that a value is included in a range, and round parentheses indicate that a value is not included in a range.
A range may have one of its numbers included while the other is not included.
Testing inputs and outputs
Working with outputs
The output column is always positioned on the right of the table. Output columns are indicated by the colour purple. Each output column handles only one output type.
Modifying outputs
Options to change the output column name, data type, output-to-input swapping, and deletion of the column itself can be accessed by clicking on the column header to bring up the options modal.
Modifying a decision table
General options
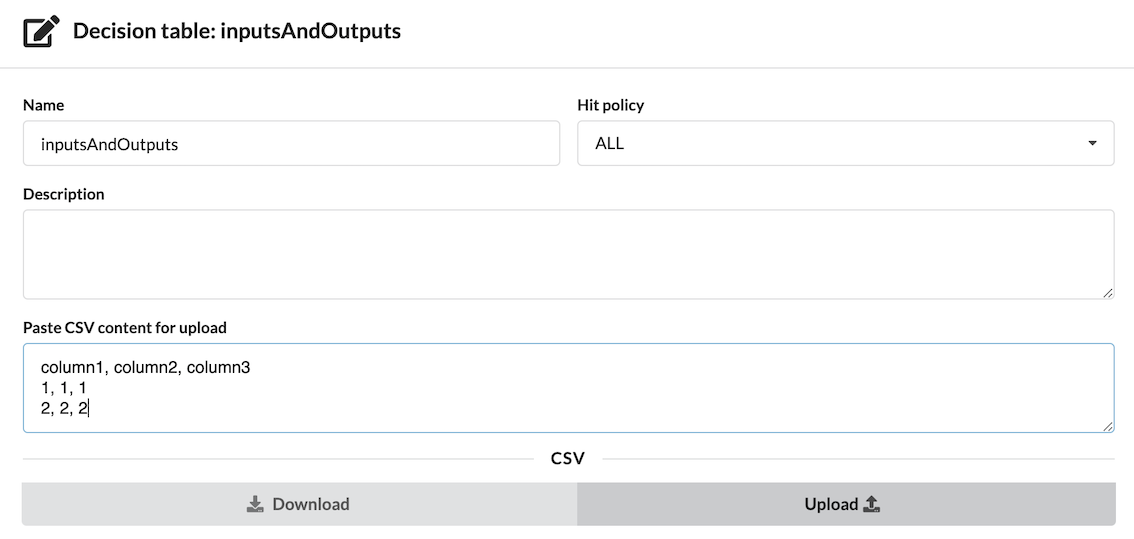
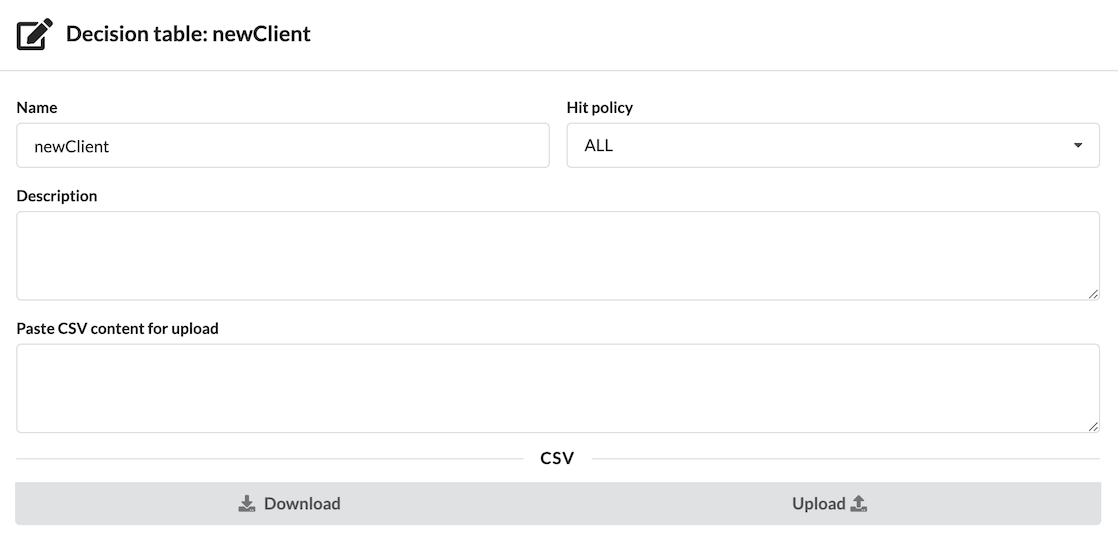
Clicking on the decision table's ID in the top left corner of the screen enables you to modify the table's name, hit policy, description, and to upload Comma Separated Values (CSV) content.
An input column and an output column can be reversed (input column changed to output, and vice-versa) by drag and drop. For example, drag the input column over the output column, and the input will be changed to output.
Hit policy
The hit policy is a rule that defines how matching rows are collected. There are two possible settings:
- FIRST: The first matching row will be returned and the matching process will be terminated.
- ALL: All matching rows will be returned, possibly resulting in multiple matches.
The hit policy defaults to ALL but it is recommended to set it to FIRST. This will need to be done with each individual decision table, as this does not apply globally.
The hit policy option can be found in the table's main options menu by clicking the table's ID in the top left of the screen.
More information on how hit policy is affected by ALL vs FIRST
Comma Separated Values (CSV)
Decision tables can be created and populated with comma separated values in two ways:
- Manual creation: You can manually enter comma separated values to create columns and rows via the table's main options. Click on the table's ID in the top left of the screen to bring this modal window up, enter values, and then select
upload. From there, input and output columns as well as data types can be assigned. - External service: You can create and populated a decision table via an external service such as importing from a database.
To modify the decision table's columns, change direction of input/output, and change the data type, click the column name to bring up the modification modal window, as seen below.
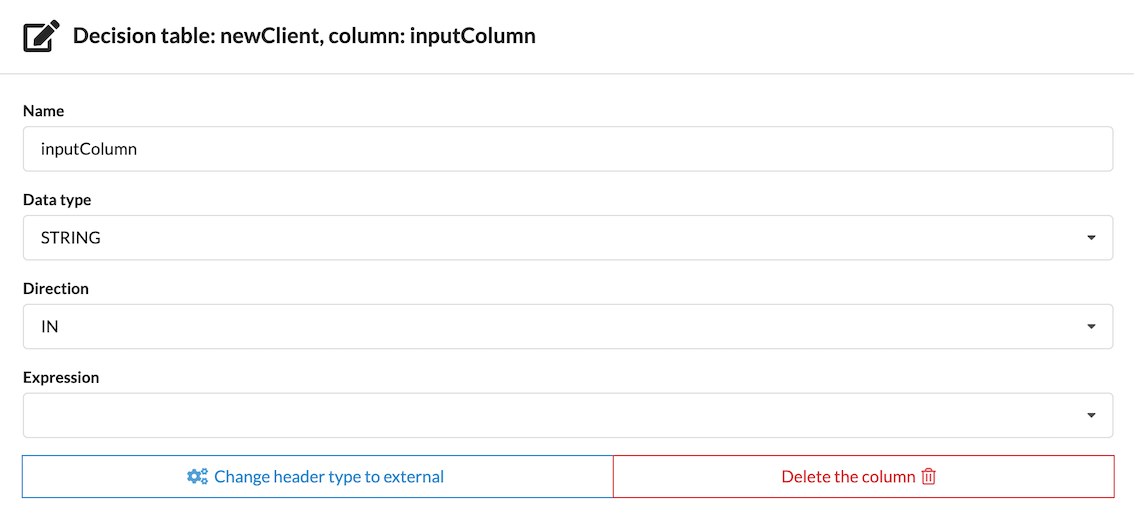
NOTE: “Change the header type to external” is a deprecated function.
Reordering columns and rows
Columns and rows can be reordered via drag and drop if they are of the same type (input rows and columns reordered with other input rows and columns, for example).
NOTE: If you try to reorder an input column and an output column via drag and drop, the input column will be swapped to an output column, and vice-versa, because the left side of the table is always for inputs, and the right side is always for outputs.
Deleting columns and rows
A column can be deleted by clicking on its name and selecting delete the column.
A row can be deleted by clicking on its row number located to its left and selecting delete row.
Simplfying a table and catching logic holes
Tables can grow very large and very complex. Accounting for each case can cause the table to grow much larger than needed. The example below shows a table which matches client ages with risk multipliers. There are basically three groups of clients based on their ages:
-
Group 1
18-30: Risk mutliplier 1.1 -
Group 2
31-40: Risk multiplier 1.3 -
Group 3
41-50: Risk multiplier 1.5
51-60: Risk multiplier 1.5
61-70: Risk multiplier 1.5
The decision table would appear like this:
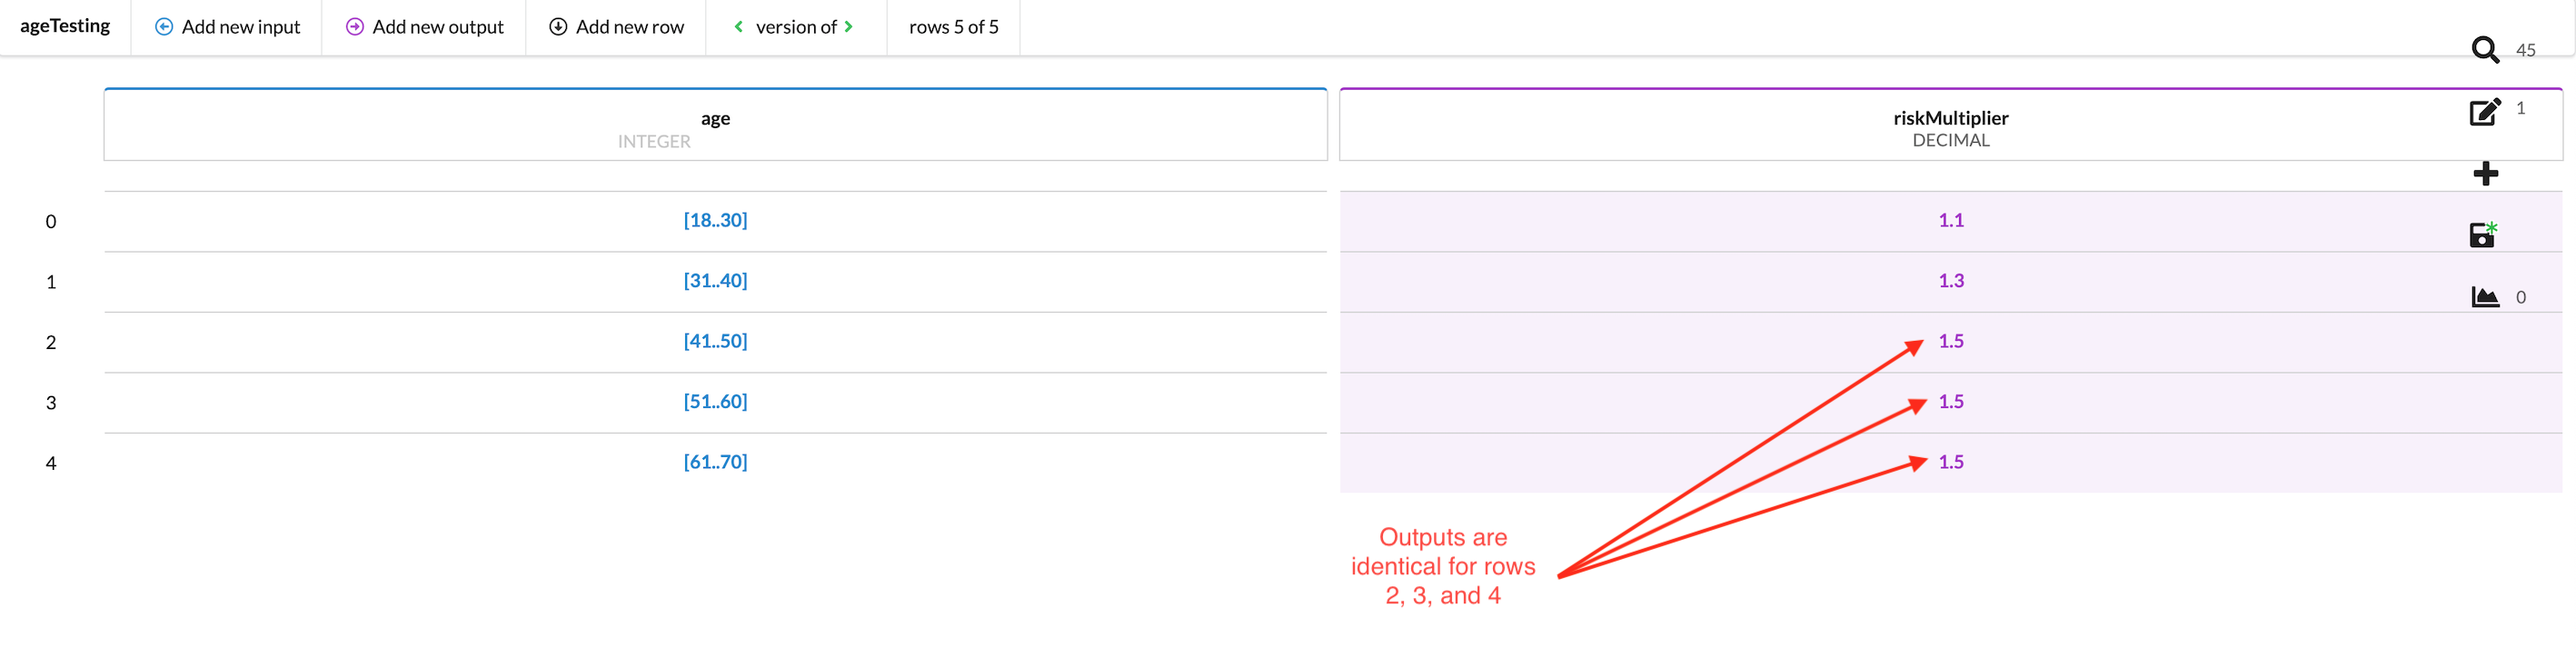
Because the last three age brackets (41-50, 51-60, 61-70) of Group 3 all have the same risk multiplier, it is not needed for them to be individually laid out in the table, resulting in three rows of identical possible outputs. This creates additional complexity where it is not needed.
This can be cleaned up in two ways:
- Leaving an input row/column without a value, resulting in this text being displayed: “No value entered, so condition is always true”
- Setting a “catch-all” value in the input row/column.
Using the example above, we can delete rows 2, 3, and 4 completely, as their inputs all result in the same output anyway. We can assign an output value of Risk Multiplier 1.5, representing the entirety of Group 3, and leave the input field blank. If Hit policy is set to FIRST, the table will, when tested, return either 1.1, 1.3, or 1.5 (for any value that is not within the range of 18-40).
The table has been cleaned up and now looks like this:
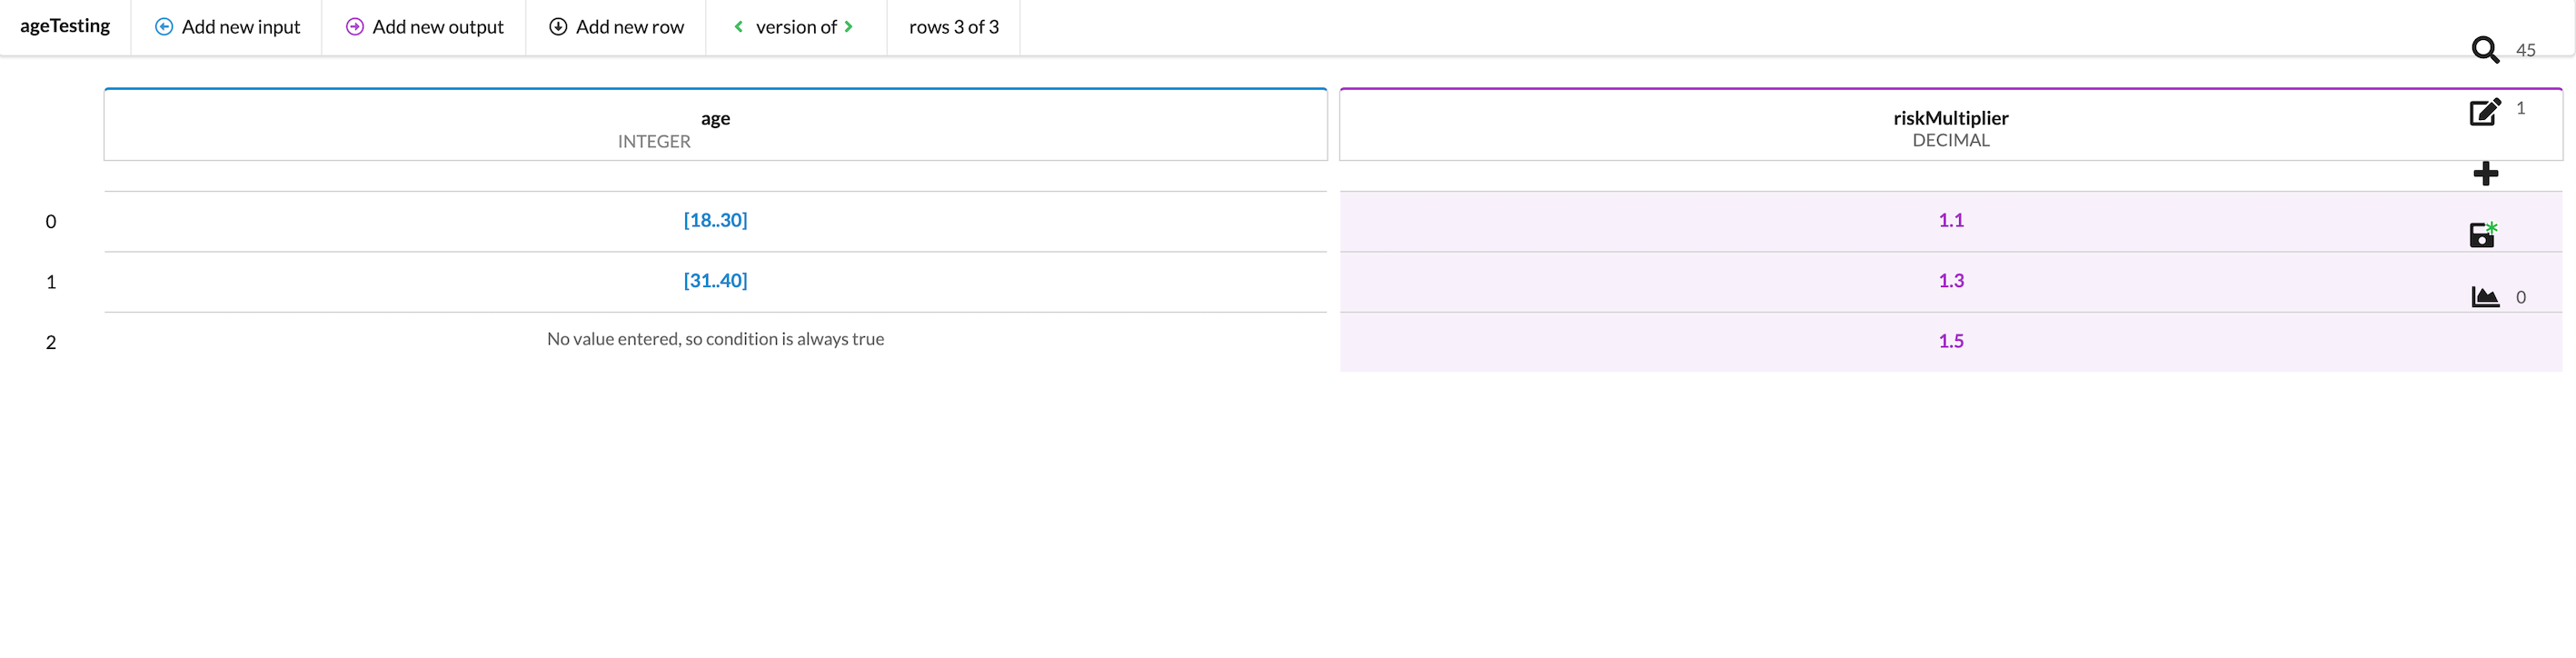
The decision table will always return true for this row and therefore, any input which does not fall within the logic of rows 0 and 1 will be matched. In practice, this means that any integer greater than 40 will return row 2. This functionality can be used, for example, as a default or “catch-all” setting to match all inputs that are outside of a given range. In addition, this can be used as a setting to catch any holes in a table's calculation logic, as this row's output will be returned if an input doesn't match any specified values. This is a useful way to simplify your tables and decrease the number of cases you need to account for while simultaneously checking your logic to ensure no gaps.
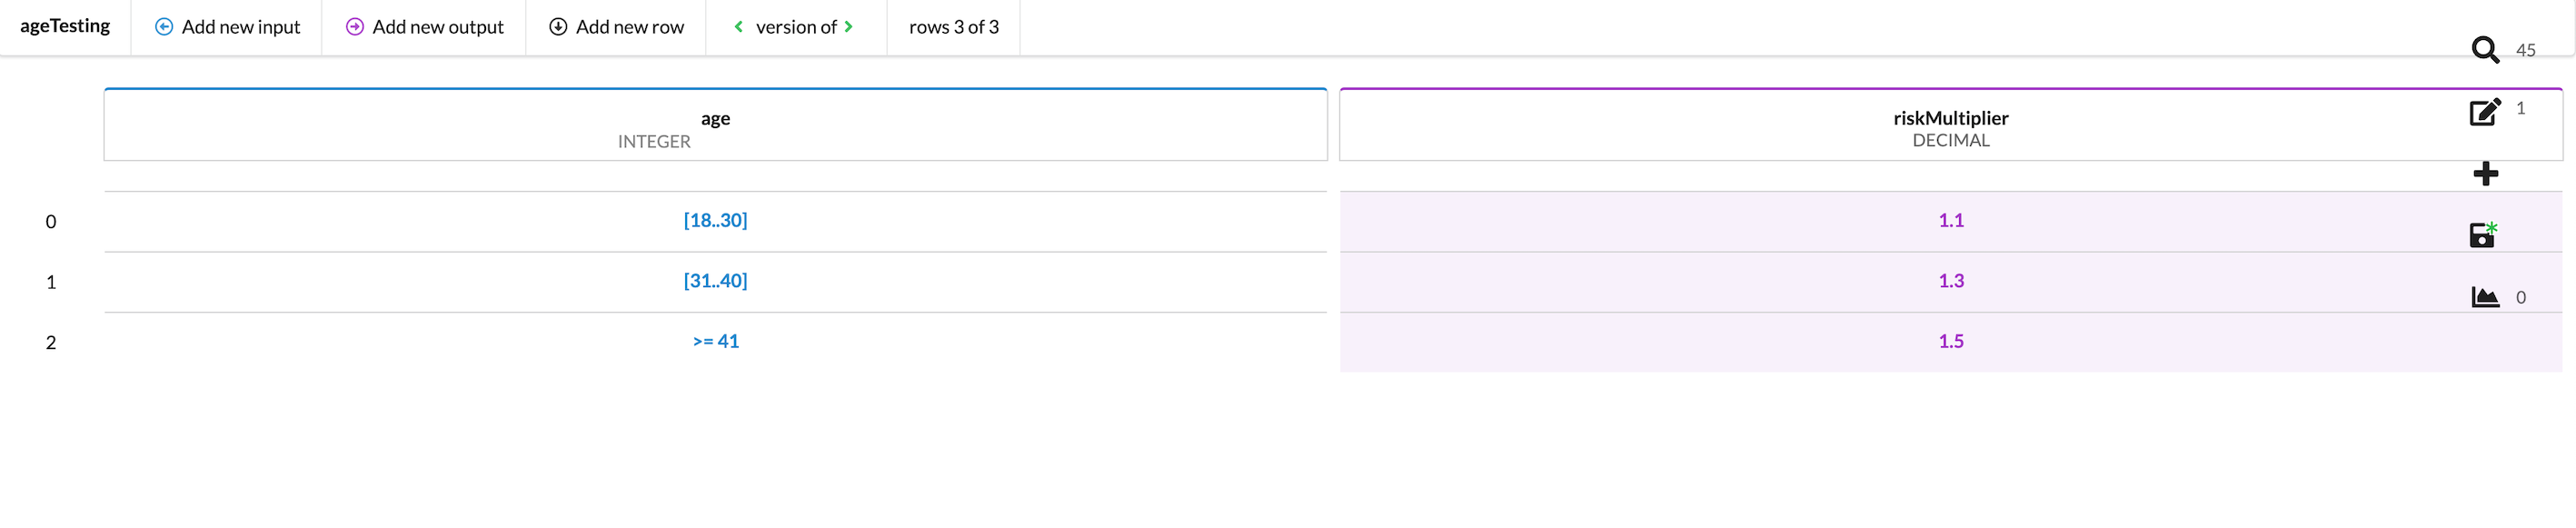
For clarity's sake, you can also write a “catch-all” value in your table's input. In our case, a catch-all value of >=41 has been added. This will return a Risk multiplier of 1.5 for any value it matches.
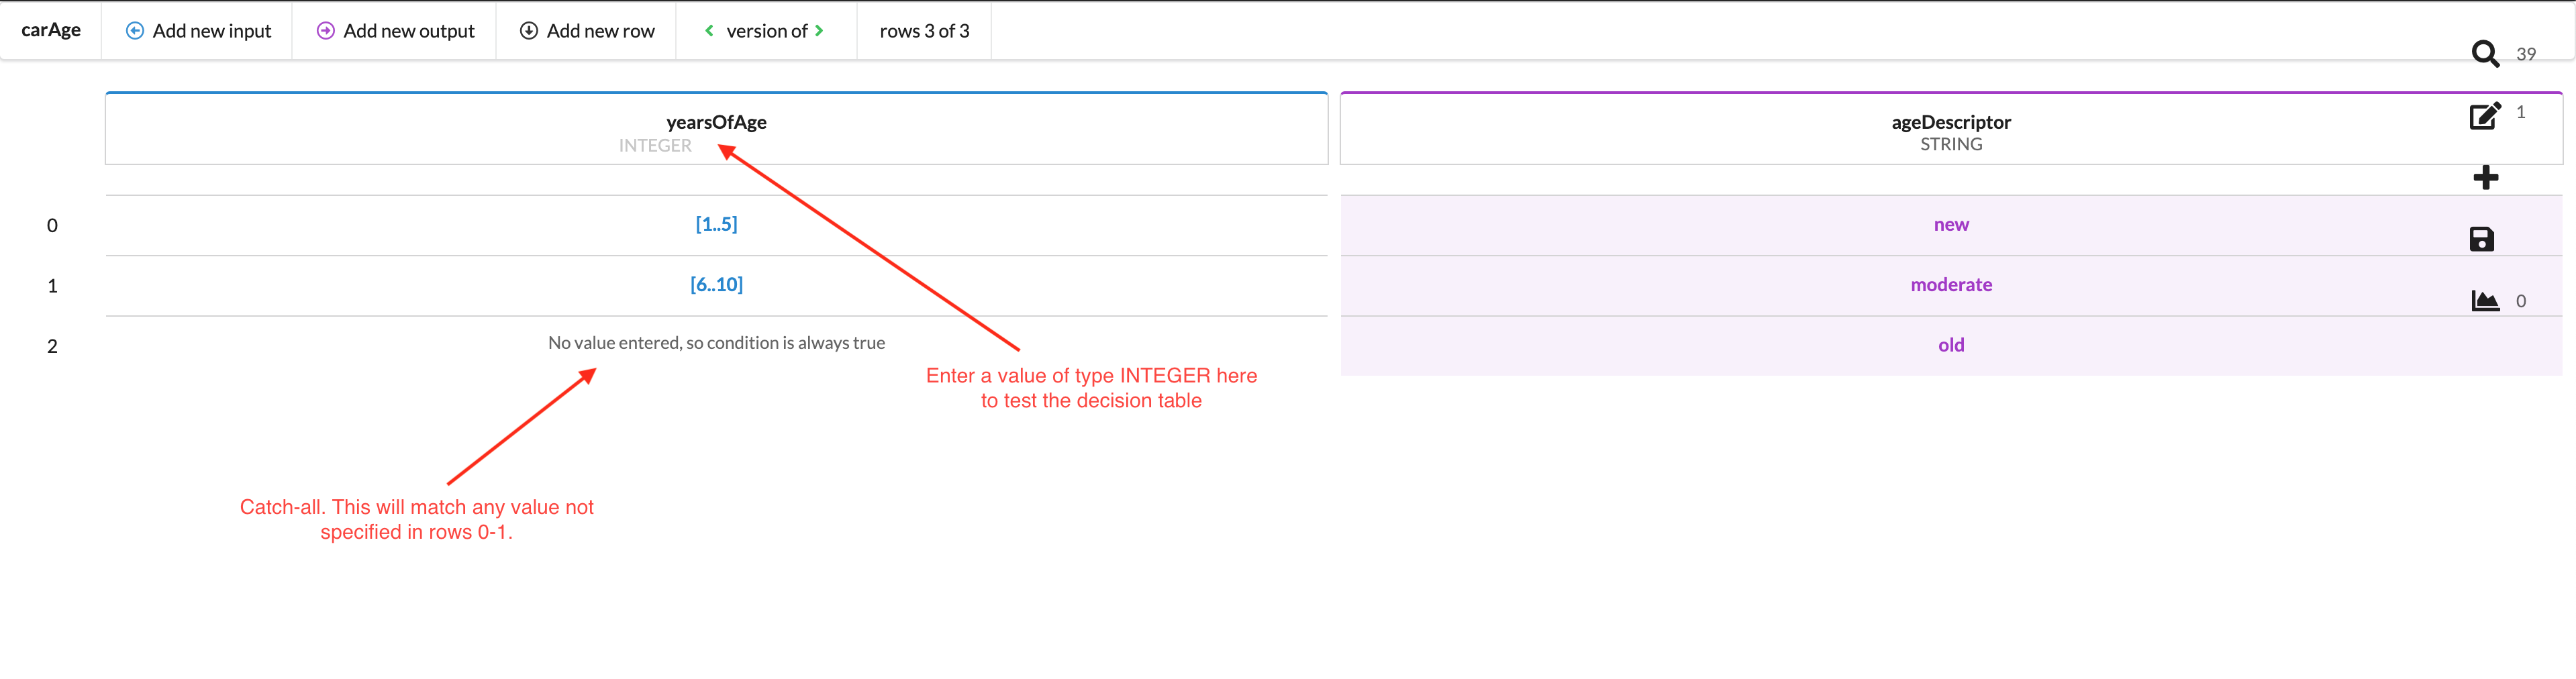
The screenshot in the following section, Testing, shows a decision table called carAge which contains three input values (two ranges and one with no value entered) and demonstrates again how you can use this “No value entered…” feature as a catch-all.
Saving changes
As with all theWrench Assetts, changes are not auto-saved. The right side menu will display a green asterisk on the save icon to indicate that there are unsaved changes. Any time important changes are made, it is the user's responsibility to save.
NOTE: The save function is NOT global. It saves only the current open asset. To ensure all changes have been saved across all open assets, navigate to any assets to which changes have been made and ensure that saving has taken place.
Testing {#testing}
Testing a decision table live is easy. Simply enter a value in the field under the column name, and be sure it matches the column's type. For example, if the column's type is DECIMAL but you enter an INTEGER type, the behaviour will be unpredicable.
Once a value has been entered to test, the decision table will return as an output any and all columns that match that input in accordance with the hit policy you have set. In the case below, a carAge INTEGER of 4 has been entered in the input, and the table has returned two matches.
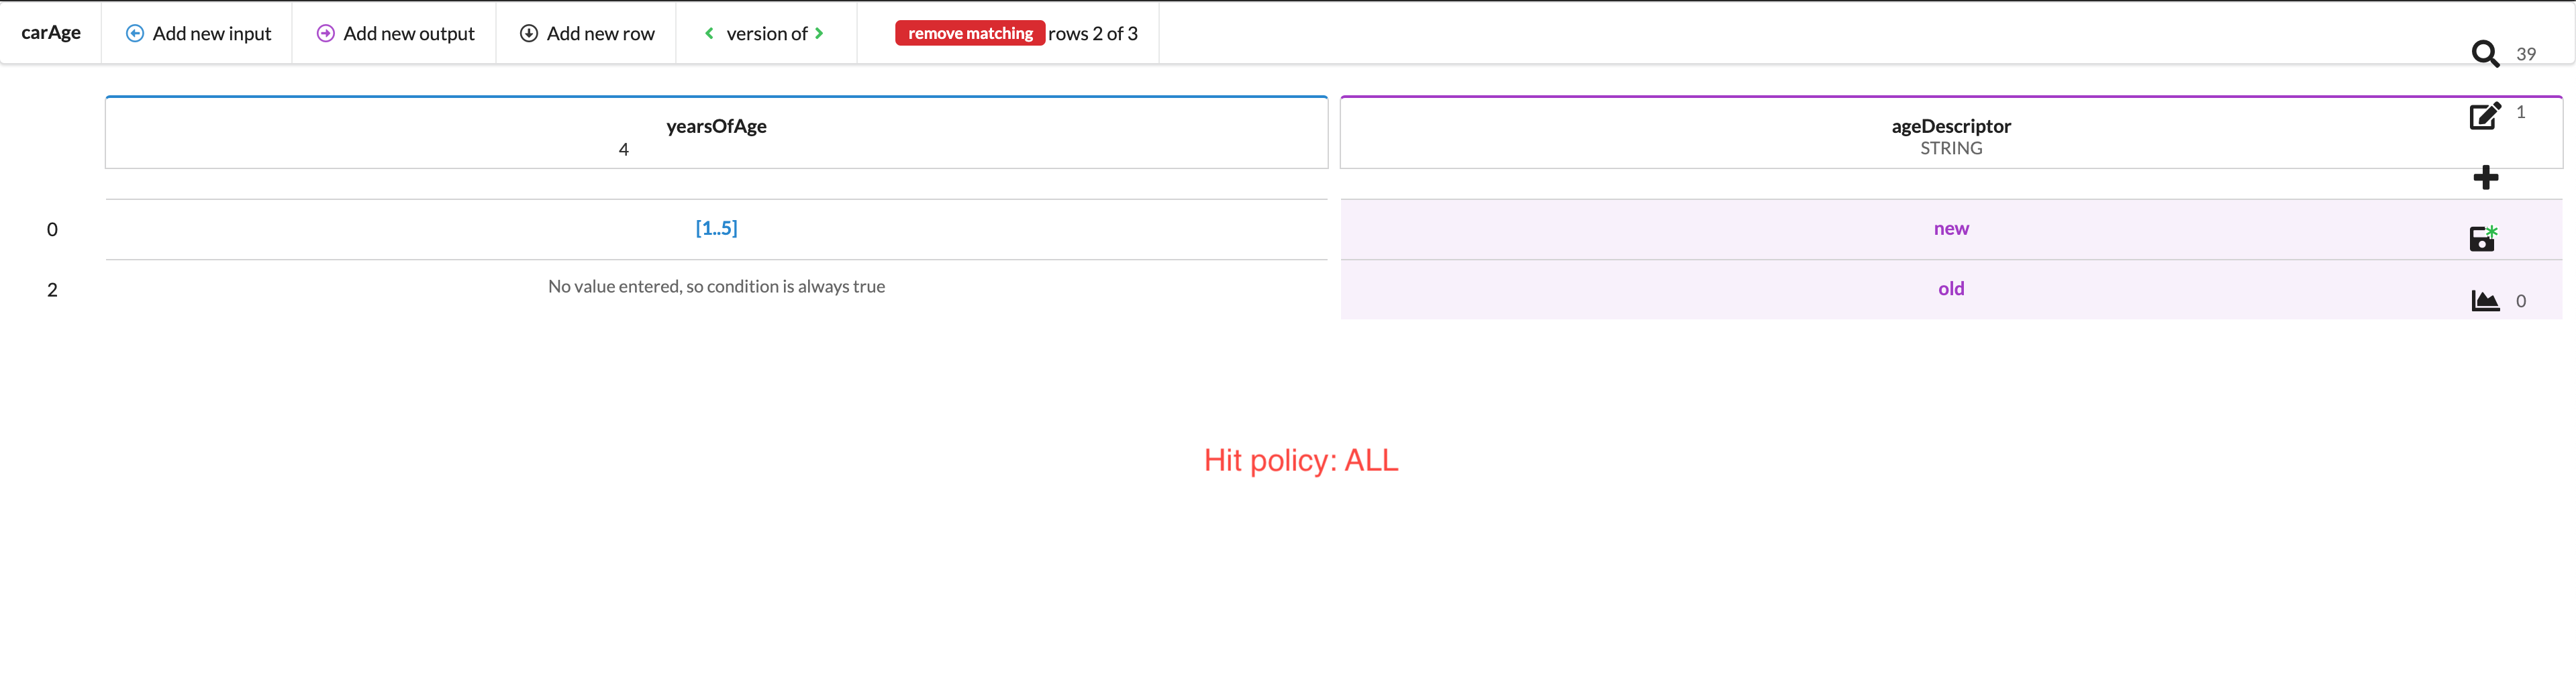
The table returned two matches because the hit policy was set to ALL. It returned all matches. If the hit policy is set to FIRST, it will stop trying to match as soon as it finds the first match. You will thus get the following result:
